Showing posts with label recycled. Show all posts

Friday, June 10, 2011

Blue card

I began by thinking about making a tag, maybe one that folds, perhaps including one with a bit of Vintage French lace and a bit of a vintage French postcard.........and so it went on. By then I'd got the bit between my teeth and ended up making a proper birthday card! 


Couldn't stop myself...........


Monday, January 24, 2011

Fabric Friendship album & thank you card

I thought you might like to see the packaging I made for the Friendship book. I used oven paper and a vintage French embroidery magazine, all sewn together as a wrapper. I stuck some cut out words all over it.


Then I tied it up with some plaited braid I made out of all the scraps I had left over from making the book.


This time I made a tag too, again with paper and fabrics and other bits and pieces.
You can get the general idea of the size of the book by the photo of me holding it in my hand.


The other day, someone did me a favour so I made this quick thank you card, took me all of 20 minutes! Which makes a change!

Saturday, January 15, 2011

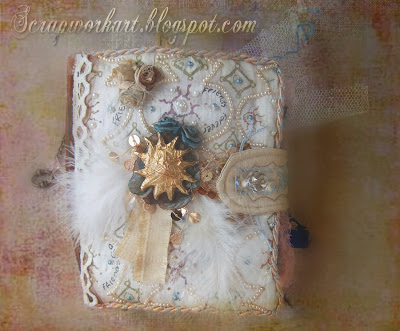
Friendship fabric book now finished!!

Hoorah, the cover was finally done today, so thats it, I'm done! It has taken me about a month to complete the whole thing but I have enjoyed every minute of it. I did not rush it, only a couple of hours a day, sometimes more sometimes less, I just went with my 'mood'


The closure is a glass bead which I removed today and placed a brass keyhole thingy on it and then sewed the  glass 'button' back on. I wrapped fine copper wire around the Sun ornament, placed it onto a flower I made ages ago as the colours were right, then onto a horrid gold sequinned star which has nice fibre and gold sequins bursting out of the edges, then a couple of white feathers and an odd bit of fabric left over from making the closure. Oh yes, and added 2 blue roses with a bit of bronze coloured mica painted on.


The 3 little roses type flowers I made by twisting odd bits of fabric and organza that were left over, still have'nt got the hang of this method yet.


The spine: I photographed the word 'Friendship' from my Dictionary, photoshopped it then sewed it over with bronze organza, which I then edged with some  lace. Topped off with a couple of antique style brads.
And, that is about it.
Tomorrow I am going to make some fancy wrapping for it before I post it to my friend on Monday.


The whole 'book' is quite sparkly, which really does not show on the photos. These latest photos, I messed around with alot, blurs, textures, masks thanks to an inspiring site: Kim Klassen  Great and really simple tutorials on creating these effects. I am still surfing her site. Some PS sites with tutorials are not very relevant I find but most of Kims tutorials are things we'd all like to do with our photos.


Sunday, December 5, 2010

New baby Card

Here it is then, the card from hell lol. I just could not get it together with this card, so much so that I get more pleasure knowing it is finished than any whilst making it. It rankled me so much, I do not even want to describe how I made it, I do not want to remember, the aggravation it caused me. Me and babies just do not mix.


Tuesday, October 19, 2010

4 way blue fabric card

I will confess straight away that I found this theme/design/layout 'somewhere' on the net, loved it so much I wanted to try it. I have no idea where it was or by whom. So if you know who, let me know because I'd like to add a link in recognition of the inspiration.
Of course it is not exactly the same, but pretty close, the 'back' is all my own work however. It's Bobs nieces birthday next week so I made this for her. She is having her 1st baby next month,she is in her mid-thirties, so I will be making my first 'baby' card, or fabric art, depending what inspires me at the time. No-one knows what sex it is so I cannot even start to think of a colour theme for that one.

Back to this card though:  I guess in reality it has 8 sides. I had my first go at fabric printing on my laser jet. I did cheat a bit as I used some heavy duty canvas sticky tape. I just stuck it down onto the printer paper, then cut it off.
Not a stick of wallpaper on this one! Because there is both paper and fabric covering both sides of each 'page' I decided not to put card on it, it makes it feel lovely and soft, but it is not floppy. Same for the envelope. Yes I realise the envelope is totally a different colour, but it was the only blue tissue paper I had. To see how I got the splattery effect on the tissue paper see the previous post to this one.


Every page is completely covered in fabric, except for the 2nd, which is vellum. Feathers from my garden, inked in turquoise.
This is the sort of back of the card, it folds up so that the happy birthday sentiment is the front, if that makes sense?
The blue heart is fabric too, on paper, and is padded. The 'Made for you' page paper is some horrid blue paper which I tea dyed, as I did with all the tulle used in the card.
This is the front of the envelope. If you can image really hard lol, its a scene with distant hills, fencing, grass and a lake. Maybe not? Too abstract? I tried to create a birds nest in the 'tree'. The word Fran, is the Ladies name....Francesca.
The rest of the photos, are just the page details:


Friday, October 15, 2010

Fabric art wallhanging & images (24)

This wallhanging has really satisfied my love for embellishing, textures and fabrics. For all that might look complex, it definitely took me far less time than making a card, it just seemed to come together without effort. I want to head in this direction more often. 
I was inspired by Ruth Rae, her book 'layered, tattered & stitched' plus several other blogs which pointed me in the right direction. Now that I have made my first one, I do not think I will need to refer to them again.


It is not quite complete as I want to add a couple of fabric tabs with a personal messages for my friend. I have hidden a 'Happy Birthday' message, which I hope she will find if she explores it, so she can hang it up without as a piece of Art without a glaring birthday sentiment.


It measures about 24cms wide by 45cms, 9.5" x 18"....ish


Anyway, I don't know what you think of it, any comments or suggestions very much welcomed :o)


I tea dyed the lace and fabrics


Centre embellishment was a necklace. All buttons are vintage.
Brass top bit, half a sawn off key


Navy blue base, is a hardback book cover


2 organza 'pockets ' containing 'things'


Friday, October 1, 2010

Upload problems, Anniversary card, free images

Before I start, I just want to say that I have spent most of tonight trying to post this. Images would not upload, it was driving me nuts. In the end I resorted to using Internet Explorer. Normally I use Google Chrome, and have never had problems, except for tonight. So I tried Firefox (I have all 3 of these browsers) and that would not have it either.
So if you too have been having the same difficulties with your Blog Posts, try using a different browser. Remember that Googlechrome and Firefox browsers are generally more efficient than Internet Explorer, and they are also FREE!

25th Silver Anniversary card.
It does not open up, there is only a front and a back because the lady who ordered it wants to frame it, so there was not much point in having 'pages' that would end up being hidden. Hence the back is fairly plain too.
 
Because of this 'restriction' I made it an oval shape.  The 'embossed' heart is in fact  part of an embossing stencil, then reversed to create the heart shape. I've been wanting to emboss on shiny cardstock for ages! The little purple spots are left overs from a silver sticker border, I just dibbed a bit of purple in the middles.
 
The white flowers on the left, hanging down (above photo) I cut from a silk flower bouquet.
 
I made all the flowers myself, fabrics and vellum, except for the large flower which is made from parts of a silk flower with paper flowers in the centre.

By the way, I chose Lilac as the secondary colour (from silver) because Irises are the flower for 25th Anniversaries. I couldn't find any suitable Iris images but went with their colour anyway.
The background paper is wallpaper which I also used to make the envelope....of course :o)
As it was, believe it or not, the actual card is simplified down to what you see, from all the 'stuff' I wanted to incorporate!


All edges of the envelope have been inked, with ordinary ink, which stuck surprisingly well to the wallpaper.
The little bit of gauze at the top of the tag was a mistake. It was on my worktop when I was making the tag and it accidentally became stuck to the tag. I quite liked it so left it on.

 
The small metal silver embellishment on the front of the envelope came from an old pair of earrings I had, as I had already used the beads as a dangly embellishment off the lilac flower, on the card, right hand side.

The dates 1985 and 2010, were made in photoshop and stuck inside the 'flap' thing on the tag. 'Robert' the same, also done on some nice bits of soft textured paper I had.

I edged the back cuts with silver border stickers, and added a ready made 3d heart
Finally, the back of the card, created in Photoshop. The full poem/verse can be read on a previous post. I made it up myself, and is quite traditional, except for the last line.


Here are your  Freebie images afterall! More of them tomorrow.

Nearly the weekend! Hoorah!