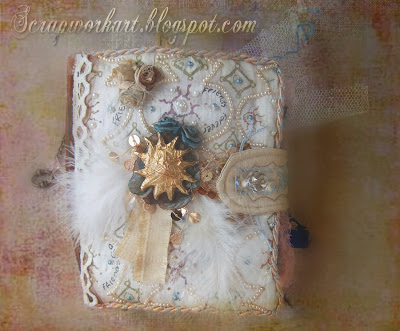
Hoorah, the cover was finally done today, so thats it, I'm done! It has taken me about a month to complete the whole thing but I have enjoyed every minute of it. I did not rush it, only a couple of hours a day, sometimes more sometimes less, I just went with my 'mood'
The closure is a glass bead which I removed today and placed a brass keyhole thingy on it and then sewed the glass 'button' back on. I wrapped fine copper wire around the Sun ornament, placed it onto a flower I made ages ago as the colours were right, then onto a horrid gold sequinned star which has nice fibre and gold sequins bursting out of the edges, then a couple of white feathers and an odd bit of fabric left over from making the closure. Oh yes, and added 2 blue roses with a bit of bronze coloured mica painted on.
The 3 little roses type flowers I made by twisting odd bits of fabric and organza that were left over, still have'nt got the hang of this method yet.
The spine: I photographed the word 'Friendship' from my Dictionary, photoshopped it then sewed it over with bronze organza, which I then edged with some lace. Topped off with a couple of antique style brads.
And, that is about it.
Tomorrow I am going to make some fancy wrapping for it before I post it to my friend on Monday.
The whole 'book' is quite sparkly, which really does not show on the photos. These latest photos, I messed around with alot, blurs, textures, masks thanks to an inspiring site: Kim Klassen Great and really simple tutorials on creating these effects. I am still surfing her site. Some PS sites with tutorials are not very relevant I find but most of Kims tutorials are things we'd all like to do with our photos.
Love and Hugs
-
Love and Hugs een kado tasje wat werkelijk een papier plezier geeft om te
maken en..te verrassen.
Neem jullie op mijn blog graag mee hoe schitterend en...
12 hours ago


.JPG)


This is so amazing i love your work....im a follower now so i dont miss anything else you make.
ReplyDeleteBonjour Sal,
ReplyDeleteIf the fabric which I used to cover the inner card was transparent then I colored the card, on that side.
The designs and embellishments where either glued on, or sewn right through the fabric layer, through the card.
When I had made all the pages the 'wrong sides' were sewn together...in order, thus hiding the back of each 'page'
I hope that helps, it did take a bit of working out!
~Janet~
looking forward to following you and your inspiration. I just started making fabric books to include certain memories.
ReplyDeleteLuckyClub Casino Site Review and Ratings
ReplyDeleteLuckyClub.lv is a website that allows users to play the latest slots, table games and luckyclub.live video poker. It was established in 2018 and it is one of the most trusted