Showing posts with label brads. Show all posts

Friday, June 10, 2011

Blue card

I began by thinking about making a tag, maybe one that folds, perhaps including one with a bit of Vintage French lace and a bit of a vintage French postcard.........and so it went on. By then I'd got the bit between my teeth and ended up making a proper birthday card! 


Couldn't stop myself...........


Wednesday, May 18, 2011

1st Birthday Card

Pink and Girly. That was my friends instructions to me to make her Granddaughters 1st Birthday card. 


As anyone knows, I have great difficulty with 'baby' cards, this was no exception, but I did decide to let the inside be fairly plain this time.


I used a Vintage French postcard in the center, and basically anything Pink I could find. The envelope, I totally covered in crystal organza. Annabella was embossed onto vellum. What I did was printed out the name in the font, reversed it, embossed the vellum on a piece of firm sponge, using the print off as a direct template.


I used lots of fabrics on the front, made my own flowers as usual. Shame the whole thing is a bit 'blocky' all squares and straight lines, inspiration was lacking. 


The lady who ordered it has asked me to make another card, so she couldn't of been too disappointed with this rather uninspiring (I think) effort.


Monday, January 24, 2011

Fabric Friendship album & thank you card

I thought you might like to see the packaging I made for the Friendship book. I used oven paper and a vintage French embroidery magazine, all sewn together as a wrapper. I stuck some cut out words all over it.


Then I tied it up with some plaited braid I made out of all the scraps I had left over from making the book.


This time I made a tag too, again with paper and fabrics and other bits and pieces.
You can get the general idea of the size of the book by the photo of me holding it in my hand.


The other day, someone did me a favour so I made this quick thank you card, took me all of 20 minutes! Which makes a change!

Saturday, January 15, 2011

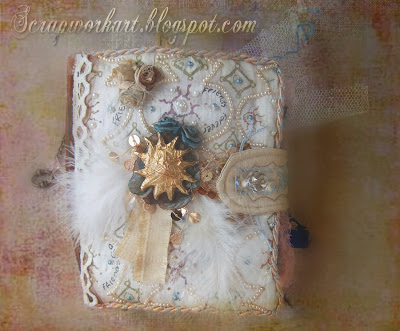
Friendship fabric book now finished!!

Hoorah, the cover was finally done today, so thats it, I'm done! It has taken me about a month to complete the whole thing but I have enjoyed every minute of it. I did not rush it, only a couple of hours a day, sometimes more sometimes less, I just went with my 'mood'


The closure is a glass bead which I removed today and placed a brass keyhole thingy on it and then sewed the  glass 'button' back on. I wrapped fine copper wire around the Sun ornament, placed it onto a flower I made ages ago as the colours were right, then onto a horrid gold sequinned star which has nice fibre and gold sequins bursting out of the edges, then a couple of white feathers and an odd bit of fabric left over from making the closure. Oh yes, and added 2 blue roses with a bit of bronze coloured mica painted on.


The 3 little roses type flowers I made by twisting odd bits of fabric and organza that were left over, still have'nt got the hang of this method yet.


The spine: I photographed the word 'Friendship' from my Dictionary, photoshopped it then sewed it over with bronze organza, which I then edged with some  lace. Topped off with a couple of antique style brads.
And, that is about it.
Tomorrow I am going to make some fancy wrapping for it before I post it to my friend on Monday.


The whole 'book' is quite sparkly, which really does not show on the photos. These latest photos, I messed around with alot, blurs, textures, masks thanks to an inspiring site: Kim Klassen  Great and really simple tutorials on creating these effects. I am still surfing her site. Some PS sites with tutorials are not very relevant I find but most of Kims tutorials are things we'd all like to do with our photos.


Friday, January 14, 2011

Friendship book page H & cover

Still not finished! The H page is done, which did ot photograph very well, but you get the idea.
For the cover I used some sumptuous raw silk beaded fabric. I think its bridal fabric. I love bridal fabrics, why dont they make them in different colours?  In order to move it away from the bridal look I drew on it with coloured fabric pens and coloured in some of the pearls. The closure I made from gold raw silk, its padded and I machined over the top and added some blue embroidery. That is not a button by the way, it is from a disassembled Christmas decoration lol.


And no it is not finished. I want to add some embellishments to the front, probably ribbons and another upcycled jewellery piece in the center. 
The weather has been fabulous today so I have been doing things outside instead of crafting indoors. Hopefully I shall get it completed tonight. I already have some ideas for wrapping it up in fabrics and 'stuff'


By the way the H page in particular and the closure was my very first attempt ever at embroidery.


Friday, September 10, 2010

Fabric card for a young Goth lady


Hello again, 2 postings in one day and changed the look of my Blog! Busy busy busy.
 I've just completed and sent this card for my Brothers Girlfriend who is a Goth with leanings towards Steampunk. I wanted to make a shabby chic fabric card but it had to be in dark colours. I made all the flowers, the back and front of the card is based on black velvet. 


I followed the colours on the centre image which I felt was appropriate for this card.


The image is actually covered over with acetate. I did try printing it onto fabric but my laser-jet printer did not want to know. I'd like to do fabric printing so I need to get the correct transfer papers to do this.
The frame surrounding the actual image was my first use of the new 'ruffler' foot I bought for my sewing machine. It worked a treat. There's going to be ruffles everywhere now! They are 'sew' easy to do! 
My machine is about 20 years old, and I now find myself drooling over new or used ones on eBay that do lots of fancy stitching.


Envelope made from wallpaper.....as usual.


Thursday, August 12, 2010

Wedding card for bikers


I confess to seeing this style of card on another blog, and thought it would be perfect for my biker friends wedding card. A card in white, pinks and ivory just would not of been suitable for them, they are far too 'alternative'.

Its an easel card with an acetate window. I did not have any inks that would stick so I ended up drawing the swirls by hand on the acetate with a dip pen in Alcohol ink, as I don't know how to apply bottled ink to a stamp. I think the result is a bit 'naff' but I knew of no alternative. As it was I waited until the 'nth hour, as I'd ordered some stayzon ink pads which never arrived in time.

I made the little cherub from polymer clay in a mould and painted it silvery black. Again I have embellished with studs round the edge. The 'congrats' stamp is the only one I have, not much choice there then! I used removable body tattoo's on the acetate...the barbed wire. I sprayed everywhere with shimmer.

With this card, this was my first use of fabric flowers (see previous post). I've used quite alot of silver stickers, which is something I do not normally do. The envelope was made from good old wallpaper and for a change I decorated the back of the envelope instead of the 'front'

If anyone can tell me how to glue items to inked paper can they tell me, because I had terrible trouble, I had to scrape off the ink down to the paper to get the embellishments to stick.
To be honest, I think I like the envelope better!




Sunday, May 23, 2010

Card: with brooch embellishment

I bought this brooch ages ago and have been awaiting inspiration to use it, so here is what I did with it:
The sun has been shining today, but I got sunburn yesterday so today I stayed indoors and made this card instead.
The 3 purple-ish strips are glitter card, the centre cream paper is handmade. I added a few brads here and there, 2 of which are dragonflies which I think is the scene on the brooch. I just love the colours of the brooch which is why I bought it.
I have not made this card for anyone, so its the first of my 'stock' cards, hopefully I will sell it, I can always add a message on the front as required and of course make a matching envelope.